Cakewalk // Documentation // Music Creator 6 Touch // Adding effects (FX)
Table of Contents Previous Next Index


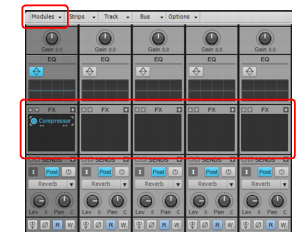
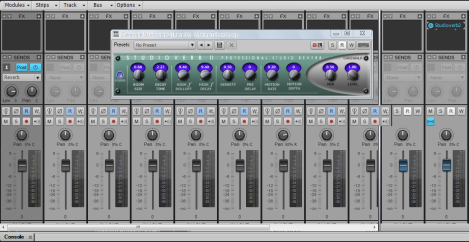
Select Mix Song from the Screensets list in the Control Bar. The Console view is now displayed below the Track view. For this part of the tutorial, we want to see more of the Console view than what is currently displayed. Depending on the resolution of your screen, you may need to adjust the height of the Console view by dragging the splitter bar up and down, or you can press SHIFT+D to maximize the Console view.
The selected effect is inserted into the track’s effects bin. The plug-in controls are also shown. Experiment with the controls on the plug-in while the music is playing back. You will hear noticeable changes to the sound.
Compressor/Gate. This plug-in affects the loudness of the sound. It can limit how loud a sound can get. It can also limit how soft a sound can get before it's completely turned off.
EQ. EQ can accentuate or turn down a certain frequency range in a sound. For example, if you have an unwanted high-pitched buzz on one of your tracks, an EQ may be able to turn that high frequency down without affecting the sound of the instrument.
Reverb. Reverb creates an artificial space. It produces echoes that are similar to the natural echoes that happen when a sound bounces off the walls in a room.
Delay. Delay plug-ins have the ability to create an echo. However, it's typically more distinct than that of a reverb. It makes a sound repeat, often in a rhythmic, musical manner.
Figure 28. Per-track EQ.
A. EQ on/off B. EQ plot
1.
Solo the tracks named Tension Climbing and Chirppy Synth.
2.
In the Tension Climbing track, enable the track EQ by clicking the 
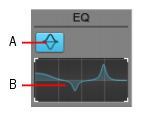
button. Double-click on the plot to show the EQ controls.
3.
Grab one of the numbered nodes and drag it around. Boost the selected band until you find the frequency range that interferes with Chirppy Synth. When you find it, turn down the selected band by dragging the node downward.
In the Chirppy Synth track, click the PLUS button (+) in the effects bin, and select Delay > Tempo Delay from the list of effects.
This is a good starting point. Sometimes the best way to familiarize yourself with a new effect plug-in is to dig in and start tweaking. You may want to try using the effect presets to see the different types of effects that are possible. Next, we'll apply some reverb to the project. Think of a reverb effect as an artificial room. We could add a separate reverb to each track, but when multiple reverbs are running at the same time it can sound “cloudy”.
Instead, we will add a single reverb effect to a bus, then send each track to that bus, at varying levels. This is where Music Creator's mixing environment offers a lot of flexibility. We will add a control to each track, which adjusts how loud the track's sound is sent to the bus. This will make the reverb sound more natural since it's similar to the behavior of an actual acoustic space. All of the different sounds we are sending to a bus can interact with each other in the “virtual room” we're creating with the reverb.
1.
We want to add this send to all tracks, so go to Edit > Select > All to select all tracks.
Figure 29. Sends module.
A. Insert Send
3.
list-image
Click New Bus. This will create a new reverb bus instead of routing the tracks to an existing bus.
list-image
In the Bus Output list, select Master.
list-image
In the Name box, type Reverb.
list-image
Click Choose Effect and select Audio Effects > Reverb > StudioVerb2.
list-image
Select the Show Effects Property Page check box.
5.

Copyright © 2024 Cakewalk, Inc. All rights reserved
Sitemap | Privacy Policy | Legal